A short section of general advice, hints and tips to help you achieve the best results possible with Paragon Paints products.
Do I need to use a primer with Paragon enamel?
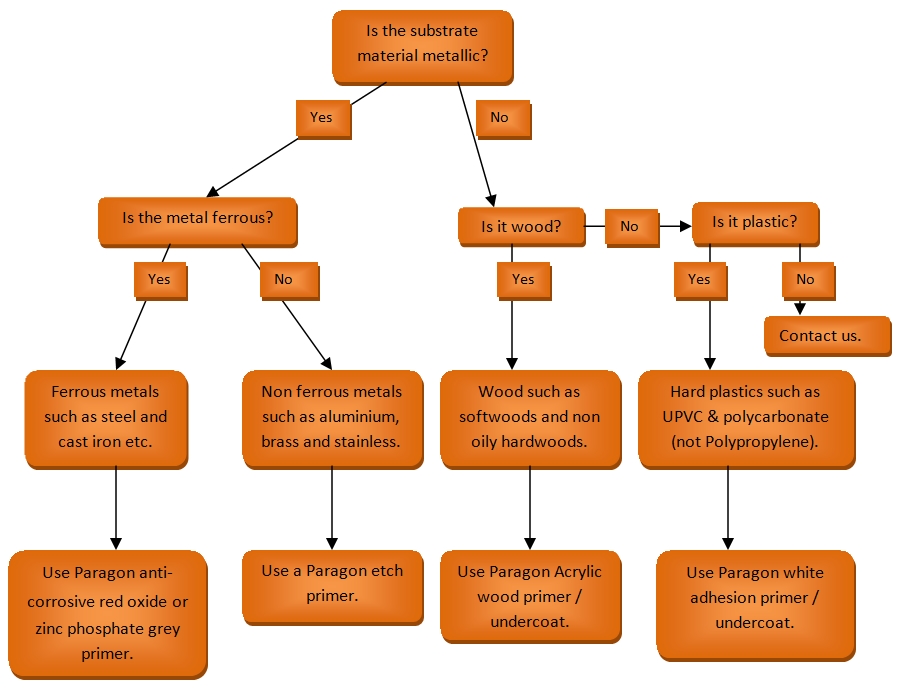
We get asked this question a lot and the answer is rarely the same as it depends largely upon many variable factors such as the material to be painted, its working environment and the standard of finish you are looking to achieve. However the following should help you to make an informed decision about the best course of action to take for your own individual circumstances.
For ferrous surfaces a primer is not an essential requirement as Paragon Enamel will adhere to clean bare ferrous surfaces that are sound and grease/oil free. You can consider the first application of Paragon Enamel to bare ferrous substrates as a self priming coat, this is the best method for situations where the maximum temperature resistance is required such as engine blocks as often primers will have a lower temperature tolerance than the Paragon Enamel. However, a primer will help if using low opacity colours or if you are seeking a very high standard of finish as it will allow the opportunity to "knock back" the primer with a fine abrasive paper between coats and provide for the opportunity to hide surface imperfections by building up primer coats.
For non ferrous metallic surfaces an etch primer is required to allow the first coat to effectively key to the non ferrous substrate. The range of Paragon Etch Primers are best applied by spray as a thin coat but can be applied by brush if required. Over-coating should be undertaken relatively soon after the etch primer has dried and certainly within 48 hours.
For wooden surfaces not previously treated we recommend the use of Paragon wood primer, previously treated surfaces need to be lightly sanded to provide an effective key for the Paragon enamel to adhere to. If your still unsure of the best way to proceed our handy flow chart below might make the choice easier or alternatively please contact us for advice.
Remember, most primer is porous in nature. If your painted item has been standing outside or exposed to the weather for any length of time in damp conditions painted only in primer moisture can penetrate the primer can cause problems later. You are best to remove it and start fresh to prevent the risk of moisture getting into the primer and coming out when the top coat has been applied. This can lead to lead micro blistering of the paint work. If this happens you'll have to start a fresh anyway so its best to plan your project to ensure you have sufficient time to see the entire paint process through in a reasonable time frame.
Ambient Painting Conditions
Always avoid painting in direct sunlight, breezy, or windy conditions. Wherever possible work indoors where you can control the air movement and ambient temperature. If the environment you are working in is dusty, clean it thoroughly and wet the floors before starting to paint. This will minimise the risk of dust settling on your newly painted surface during the application or drying period. If painting in cold conditions where heat is required use dry heaters only, avoid paraffin heaters and keep the temperature as even as possible. Leaving any heating on until the paint is dry.
Avoid painting in high temperatures unless you really have to as it can cause solvent entrapment due to the surface of the paint drying too fast. This will ultimately result in micro blistering. Damp conditions and condensation can also cause blistering as the trapped liquid is drawn to the surface.
Surface / Substrate Preparation
The best way to prepare new ferrous surfaces is to have it sand blasted. If that's not possible or practical the next best thing is to thoroughly degrease the item to be painted and wire brush the surface to a bright finish. Ensure that all loose mill-scale and rust is removed wherever possible. Once completed apply your first coat in a short time period to prevent the opportunity for the clean bare surfaces to rust again. For cast surfaces or where the metal surface is pitted a good coat of Paragon Anti Corrosive Zinc Phosphate Primer will build the surface sufficiently to make the surface flat without the need for filler.
If you are working on existing painted metal the best action is to remove all old paint by sand blasting to the bare metal. However if the existing paint work is in reasonable condition rub it down thoroughly with 240 grit sand paper and remove any rust. If you break through to bare metal in any area apply a coat of Paragon Primer to the areas affected. Once completed apply a second coat of Paragon Primer over the entire area to achieve a uniform base coat finish.
If the paint work is in great condition and you just need a colour change remove all polish residues, clean thoroughly and then rub down lightly with a fine sand paper before applying an appropriate Paragon Primer / undercoat for your new topcoat colour.
Once the preparation work is completed to a good standard aim to apply your Paragon Enamel top coat quickly and with confidence. Too little and you will have dry areas in the finish, too much and there will be sags and runs. Sags in vertical panels can be minimised by vertical 'laying off strokes' from top to bottom.
Paragon Paints supply a range of different Primers for different surfaces as follows:-
- Paragon Wood Primer - for wood.
- Paragon Anti Corrosive Zinc Phosphate Primer - for iron and steel.
- Paragon Etch Primer - for Aluminium and other metals (best applied by spray application).
- Paragon Epoxy Primer - for Fibreglass.
Painting
It may seem obvious but do ensure the paint you choose is correct for your intended application. i.e.. of a suitable temperature rating and appropriate colour, check all mixed colours for accuracy before begin.
If you are a novice we recommend you practice first! Nearly all Paragon products with the exception of the Etch Primer and Fluorescent colours are primarily designed to be applied by brush. However if you prefer all Paragon Enamel finishes can be applied by spray with the addition of suitable thinners. If you are applying by brush please do make sure you have a good quality brush. Purdy are in our opinion the best. If you can't spray and don't have the confidence to brush you can use a glossing roller, but have someone else on hand to 'lay off' the paint with a continuous vertical brush stroke. We recommend you decant into a paint kettle or similar only sufficient paint to complete the area to be coated. This will keep the remainder of the paint in it's original tin clean and free from contamination.
The objective of good quality coach painting is to apply an even coverage of paint with relatively fast brush strokes at all angles covering a small area of about 30” square. Once empty immediately refill the brush and repeat the process, brushing into the area you've just covered. As soon as a section is covered lay the paint off top to bottom. Do this from start to finish very quickly and then keep on going in the same fashion until the area to be painted is complete - always brushing back into the section you've just covered. Resist the temptation to stop and admire your work until the complete area is finished.
If you find a run or sag when the paint is initially dry/drying don't rub it down as it is likely to still be wet underneath. Instead slice the top off it with a sharp blade and leave it to dry again. The next day you will be able to rub it down successfully and re-coat either the immediate area or if required the whole panel. Always use the biggest brush you can handle for the job, a 3” should be sufficient for most panel work. If you are using masking tape make sure you remove it as soon as you put the brush down.
Paragon products are not generally intended to be thinned unless you are spraying. If you find the paint is too thick or is difficult to work we recommend a small amount of the appropriate thinner. This lubricates the paint molecules making them flow easier. Start by adding 2-3% and work upwards to a maximum of 10%. Remember you can always add a little more but you can't take any out!
A typical paint build to a high standard on steel or iron would be two coats each of Primer / Undercoat, and Enamel followed by two coats of clear lacquer if required. For a finer finish use an extra coat of undercoat and perhaps two more of enamel. This allows for more thorough rubbing down and better coverage on weaker colours.
If you are able to re-coat undercoats on consecutive days there is no need to rub down between coats. If for instance you could prime on Monday and Tuesday then Undercoat on Wednesday Thursday & Friday you would have maximum build available before rubbing down. If you can't paint on consecutive days then it is advisable to rub down between coats. When you have rubbed the surface down ready for the first top coat and every time you subsequently rub down the paint work wipe it off with a tack cloth. This special sticky cloth with remove any debris and dust from the surface providing you with a better surface to paint on without leaving any residue. When rubbing down between top coats use a 600 grit sand paper before finishing off with a 1000 grit. This will remove your sanding marks from the surface and provide the best finish for the final coat.
As always there is the exception to the rule, this being etch primer and fluorescent colours, these are always best applied by spray application, especially on larger fabrications to ensure an even coverage and uniform finish is achieved.
Varnish and Lacquer
Varnish or Lacquer is a superb way of protecting and prolonging the lifespan of a paint finish. A good clear coat like our Paragon Lacquer will protect the paint work from light scratching and depending on its degree of UV resistance from the affects of UV light exposure from sunlight.
Its important to be aware that Varnish and Lacquer does need reapplying periodically depending on its exposure levels to the elements. This may seem counterproductive and expensive but its cheaper and quicker than a full repaint. As with all things the care taken of the varnished surface will have a factor in the lifespan of the overall finish. If Varnish is scratched it's important to rub down and re-coat the area. The scratch can allow weather penetration into the varnish causing crazing and flaking.
Paragon clear coat is highly reflective of UV rays meaning that it will give added protection to colours particularly susceptible to fading. Its also (unlike a lot of other Varnish) completely clear. Also as its not a polyurethane product it does not suffer from the 'yellowing' inherent in such things. It has been designed to flow well and to produce a flat mirror-like finish without leaving brush marks. It takes 10 days to cure to its maximum hardness.
Lastly and perhaps somewhat confusingly make sure you re-coat your varnish before it looks like it needs it. If it looks like it needs another coat, you may be too late.
Potential Problems
If it is too cold or too hot the paint will not want to flow. In these conditions it may be necessary to ease the paint slightly with Owatrol oil or thin the paint slightly with the appropriate thinners. It is however always better to wait for the conditions to improve to a climate more conducive to painting.
If your applying a red or yellow and its patchy remember that these colours are particularly weak. Make sure that the undercoat is rubbed down evenly and plan for 3 coats of top coat. If an insect or other debris lands in the paint resist the temptation to pick it out as this will cause much more damage. Pick it out after the paint is dry.
If the paint is drying too quickly even though its the right consistency and flowing well either work quicker or work on smaller areas. The secret of Coach Painting is the speed at which its done. The best way to keep a 'wet edge' once your confident is to go for it! and work quickly. Use the priming and undercoating as practice.
